Party Dessert Tray: Wow Your Guests
Whether you're hosting a holiday party, a wedding, or a casual gathering, we're here to guide you. We'll show you how to create a beautiful and delicious party dessert tray.

📋 Overview Of Content
. Essential Party Dessert Tray Planning Guide
. Selecting Your Dessert Components
. Creating the Perfect Party Dessert Tray Layout
. Temperature Management and Storage Solutions
. Professional Garnishing Techniques
. Transport and Setup Strategies
. Seasonal Party Dessert Tray Variations
. Dietary Considerations and Alternatives
. Conclusion: Mastering Your Dessert Tray Presentation
. FAQ
We're excited to help you create a stunning party dessert tray. It will impress your friends and family. A well-designed dessert platter is perfect for any gathering. With a few simple steps, you can make a professional-looking display that will wow your guests.
To start, let's look at what makes a great party dessert tray. A good platter should have a variety of sweet treats. This includes classic desserts like brownies and cookies, and more elaborate creations like cakes and pastries.
We'll show you how to pick the perfect desserts and arrange them in a way that looks great. This will make your party food display stand out.
As we guide you, you'll learn to create a stunning dessert platter. It will serve around 20-30 people. We'll cover planning, picking desserts, and arranging them perfectly for your party dessert tray.
So, let's get started and make your party dessert tray a reality!
Key Takeaways
- Create a stunning party dessert tray that will wow your guests
- Select a variety of sweet treats for your dessert platter
- Plan ahead to ensure a beautiful and delicious party food display
- Follow our simple steps to create a professional-looking dessert tray
- Make your party dessert tray yield around 20-30 servings
- Use our guide to create a visually appealing layout for your party dessert tray
- Impress your friends and family with a well-designed dessert platter
Essential Party Dessert Tray Planning Guide
Creating a stunning holiday dessert spread is our goal. We want to ensure you impress your guests. Whether it's an event catering platter or a simple appetizer tray, planning is key. We'll guide you through the essential steps to create a beautiful and delicious dessert tray.
First, let's talk about calculating portions per guest. We suggest 2-3 desserts per person, depending on the dessert size and type. For a party with 20 guests, prepare around 40-60 desserts. This way, each guest has a variety of options, and you won't run out too quickly.
Calculating Portions Per Guest
Here's a simple formula to calculate portions per guest:
- Determine the number of guests attending the party
- Decide on the number of desserts per guest (2-3)
- Multiply the number of guests by the number of desserts per guest
This will give you the total number of desserts needed for your party.
Timeline and Advance Preparation
Start your preparation 30 minutes in advance. This ensures all desserts are fresh and ready to serve. You can also prepare some desserts ahead of time, like baking cookies or making cake pops, to save time on the party day.
| Task | Time Required |
|---|---|
| Calculating portions per guest | 10 minutes |
| Advance preparation | 30 minutes |
By following these simple steps, you'll create a stunning holiday dessert spread. It will impress your guests and leave them wanting more. Remember, have fun and be creative with your dessert choices, whether it's for an event catering platter or a simple appetizer tray.
For a diverse dessert tray, consider pairing it with Chocolate Bun Delight, which adds a rich, chocolatey touch.
If you're planning a full meal, add a savory side like Grilled San Antonio Red Pepper Chicken Marinade Recipe to your dessert tray. For a refreshing drink, prepare Blue Razz Ice Juice.
Selecting Your Dessert Components

Creating a stunning sweet treats serving tray starts with picking a variety of desserts. They should match in flavor, texture, and look. This way, your guests will be impressed and eager to try everything.
For a finger foods presentation, choose desserts that are simple to grab and eat. Think about bite-sized cakes, cookies, and pastries. You can also add fruit kebabs, chocolate-dipped strawberries, or mini cheesecakes. The goal is to have desserts that taste great and are easy to handle.
Here are some ideas for your sweet treats serving tray:
- Cakes: vanilla, chocolate, or red velvet
- Cookies: sugar, oatmeal raisin, or peanut butter
- Pastries: fruit tarts, eclairs, or cream puffs
- Fruit-based desserts: fruit salad, fruit kebabs, or fruit parfaits
Think about dietary needs and flavors when picking your desserts. You want everyone to find something they like. With some planning and creativity, you can make a finger foods presentation that looks great and tastes amazing.
| Dessert | Flavor | Texture |
|---|---|---|
| Cake | Vanilla, chocolate, or red velvet | Mousse, creamy, or dense |
| Cookies | Sugar, oatmeal raisin, or peanut butter | Crunchy, chewy, or soft |
| Pastries | Fruit, cream, or chocolate | Flaky, crispy, or creamy |
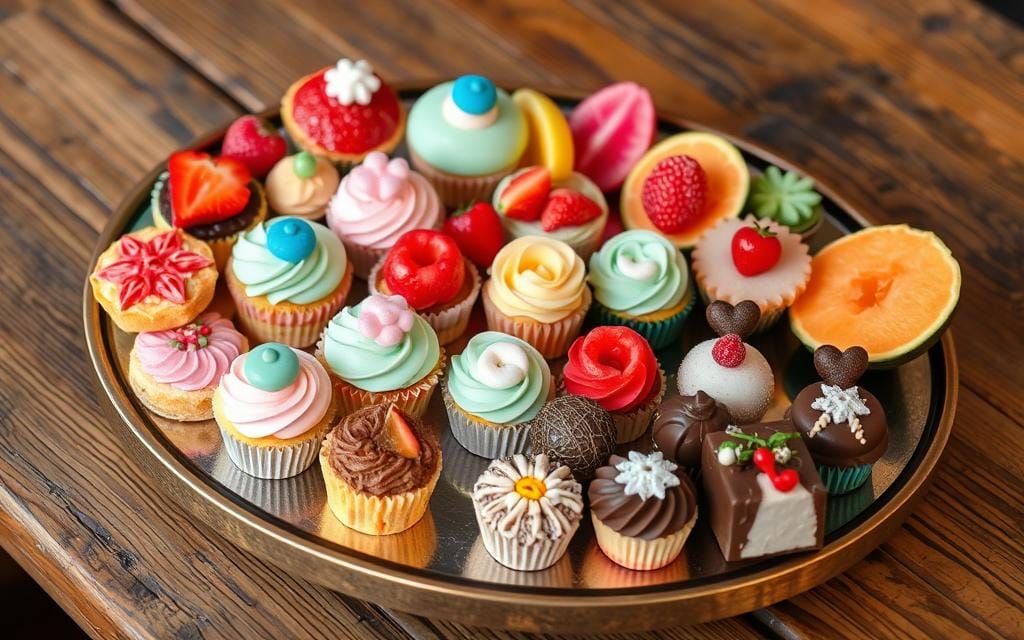
Creating the Perfect Party Dessert Tray Layout

To make a stunning party dessert tray, we need to think about the layout. This is where the magic happens, and your dessert platter comes to life. Set aside 30 minutes for the layout, and follow these tips for a visually appealing arrangement.
A well-designed festive dessert arrangement can impress your guests. When planning, think about the height and dimension of your desserts. Place taller desserts, like cakes and cupcakes, at the back. Shorter ones, like cookies and brownies, go towards the front.
Height and Dimension Principles
Here are some key principles to keep in mind:
- Vary the height of your desserts to add visual interest
- Use pedestals or stands to elevate taller desserts
- Balance large desserts with smaller ones
By following these principles, you'll create a beautiful and inviting party dessert tray. And don't forget to have fun with it! The most important thing is to make your dessert platter reflect your personality and style.
Color Coordination Strategies
Color coordination is key for a stunning festive dessert arrangement. Choose a color scheme that fits your party theme. Select desserts that fit within that scheme. Use garnishes, like fresh fruits and nuts, to add pops of color to your tray.
Remember, the key to creating a beautiful party dessert tray is to have fun and be creative. With these tips and a little practice, you'll be a pro in no time. So go ahead, get creative, and wow your guests with your stunning dessert platter!
For a sweet tropical finish, serve your dessert tray with Pineapple Condensed Milk Dessert.
Temperature Management and Storage Solutions

Creating a stunning party food display is all about keeping your desserts fresh and safe. It's important to manage temperature and storage well. Set aside 10 minutes for this to ensure everything is perfect.
For the perfect temperature, use refrigerators or coolers. Ice packs or frozen gel packs can also help keep things cool. For example, chilled desserts like cheesecake or mousse need a cooler with ice packs to stay safe.
- Store desserts in airtight containers to keep them fresh
- Keep desserts away from direct sunlight and heat sources
- Use refrigerators or coolers to maintain a safe temperature
Follow these tips to create a beautiful and safe display. Always put food safety first when storing and serving desserts at your event.
Professional Garnishing Techniques
To make your party dessert tray stand out, spend 20 minutes on garnishing. This small effort can turn your appetizer tray or holiday dessert spread into a stunning sweet treats serving tray. We'll dive into the world of garnishing, covering edible decorations, seasonal accents, and tips for color enhancement.
Edible Decorations
Edible decorations can add elegance to your desserts. Use fresh fruits, nuts, or chocolate shavings for beautiful designs. For a holiday spread, try seasonal fruits like cranberries or pomegranates.
Seasonal Accents
Seasonal accents can make your dessert tray themed. For example, autumn leaves or flowers can create a fall theme. Winter-themed trays can use snowflakes or holly leaves.
Color Enhancement Tips
Color tips can make your dessert tray visually appealing. Choose a color scheme that fits your theme. Use decorations and accents to enhance colors. Here's a table to help plan your color scheme:
| Theme | Color Scheme | Edible Decorations | Seasonal Accents |
|---|---|---|---|
| Fall | Orange, Yellow, Red | Fresh fruits, nuts | Autumn leaves |
| Winter | Blue, White, Silver | Chocolate shavings, snowflakes | Holly leaves, snowflakes |
Transport and Setup Strategies
Transporting and setting up your party dessert tray should be easy. We suggest you spend 10 minutes on it. This time allows you to load your dessert platter safely and set it up nicely at the party.
A good finger foods presentation is essential for a great party. Use a strong serving tray or cake stand to keep your desserts safe. Serving utensils and napkins make serving and eating more fun.
Here are some tips for setting up your dessert tray:
- Choose a stable and level surface for your dessert platter
- Arrange your desserts in a visually appealing way, considering height, color, and texture
- Make sure to leave enough space between each dessert for easy serving and access
By following these tips, you'll create a stunning party dessert tray. It will impress your guests and make your party unforgettable.
Seasonal Party Dessert Tray Variations
Exploring party dessert trays means thinking about the season and occasion. A great holiday dessert spread can make your event unforgettable. With creativity, you can make a beautiful event catering platter that shows off your cooking skills.
Seasonal variations offer endless choices. For summer, try fruit salads, sorbet, and lemon bars. In winter, go for festive dessert arrangement ideas like gingerbread men, snowball cookies, and hot chocolate.
Summer Refreshing Options
- Fruit salads with fresh berries and melon
- Sorbet in unique flavors like mango and pineapple
- Lemon bars with a shortbread crust
Winter Holiday Specialties
- Gingerbread men with detailed designs
- Snowball cookies with powdered sugar
- Hot chocolate with marshmallows and whipped cream
Dietary Considerations and Alternatives
When planning your party food display, it's key to think about your guests' dietary needs. We want to make sure everyone can enjoy the food, no matter their dietary restrictions. To help, we can offer gluten-free, vegan, and sugar-free options.
Preparing in just 10 minutes can help a lot. We can set up a table for gluten-free foods like fruit and cheese platters. We'll label them clearly so guests with gluten intolerance know what they can eat.
Here are some alternative desserts we can offer:
- Fresh fruit skewers with yogurt dip
- Dark chocolate-dipped strawberries
- Sugar-free cheesecake
These options make our party food display inclusive and fun for everyone. We can use a sweet treats serving tray to display the desserts. This makes it easy for guests to serve themselves. And we'll label each dish with its ingredients, so guests with dietary restrictions can make informed choices.
With a bit of planning and creativity, we can make a party food display that's both tasty and considerate. By providing a range of options, including gluten-free, vegan, and sugar-free choices, we can ensure everyone has a great time. They'll enjoy the appetizer tray and sweet treats serving tray.
Conclusion: Mastering Your Dessert Tray Presentation
As we wrap up our guide on making a stunning party dessert tray, remember the main secret. It's all about paying close attention to every detail and putting in the effort. Plan your portions, timeline, and tools well. Choose your desserts wisely and arrange them to catch the eye.
Impress your guests with a delightful dessert tray, and explore more recipes like Enjoy a Delightful Lotus Seed Honey Drink for a perfect drink pairing.
Also, think about any dietary needs and have some special options ready. This way, everyone can enjoy the festive treats. With practice and this guide, you'll soon be a pro at making amazing dessert trays. Your next party will be unforgettable.
FAQ
What is the typical yield for a party dessert tray?
A party dessert tray usually serves 20-30 people.
How long does it take to prepare a party dessert tray?
Preparing a party dessert tray takes time. It depends on the steps involved. Here's a breakdown: - 10 minutes for calculating portions - 30 minutes for advance preparation - 20 minutes for selecting dessert components - 30 minutes for creating the layout - 10 minutes for temperature management and storage - 20 minutes for garnishing - 10 minutes for transport and setup - 30 minutes for seasonal variations - 10 minutes for final touches
What key equipment and tools are needed for a party dessert tray?
You'll need serving platters or trays, cutting boards, knives, and piping bags. Also, baking or chilling equipment might be necessary.
How do I ensure proper temperature management and storage for the desserts?
Use refrigerators, coolers, or other storage solutions. This keeps the desserts fresh and safe to eat.
What are some professional garnishing techniques I can use to enhance the dessert tray?
Use edible decorations, seasonal accents, and color tips. These add elegance and sophistication to your desserts.
How do I accommodate guests with dietary restrictions on the dessert tray?
Offer gluten-free, vegan, or sugar-free options. Make sure to label them clearly for guests to know.